Nuke's Expression Language - Making Burnins with Tcl

This post is about creating guides in nuke for vendor-side VFX internal reviews. Full demo here and Git Repo with Script here
Introduction
The VFX for Spike Lee's film Highest 2 Lowest were done in large part at Baked Studios in New York City. The film had a long list of camera formats used during shooting and each camera had its own crop factor from plate to what was in the edit. This presented us with a challenge to manage aspect ratios with letterboxing along with these overall crop factors programmatically from shot to shot.
Tcl (Pronounced "Tickle") is a scripting language that Nuke modifies to create an expression language specialized for compositing math. Nuke's Tcl expressions can be used to great effect for simple modifications to knob parameters via mathematical expressions with its syntax.
Baked Studios by the time I left, had a robust python based pipeline integrated with ShotGrid toolkit. Largely built by U.K company Nodes & Layers, this pipeline allowed us to pull data from ShotGrid into nuke for slates, burnins, and various Tcl expressions if needed. The details of this workflow are largely proprietary and out of the scope of this blog post, but I encourage people to reach out to both Baked Studios and Nodes & Layers for details and or services.
Utilizing the ability to pull information from ShotGrid into a render template, we opted to add a "Shot Scale Factor" field in SG that would be the basis for how each rendered EXR would be scaled for DNxHD Quicktime reviews.
The reviewer would see a high res quicktime version of the below image, with the whole plate in view and then a "what the client will see" overlay:
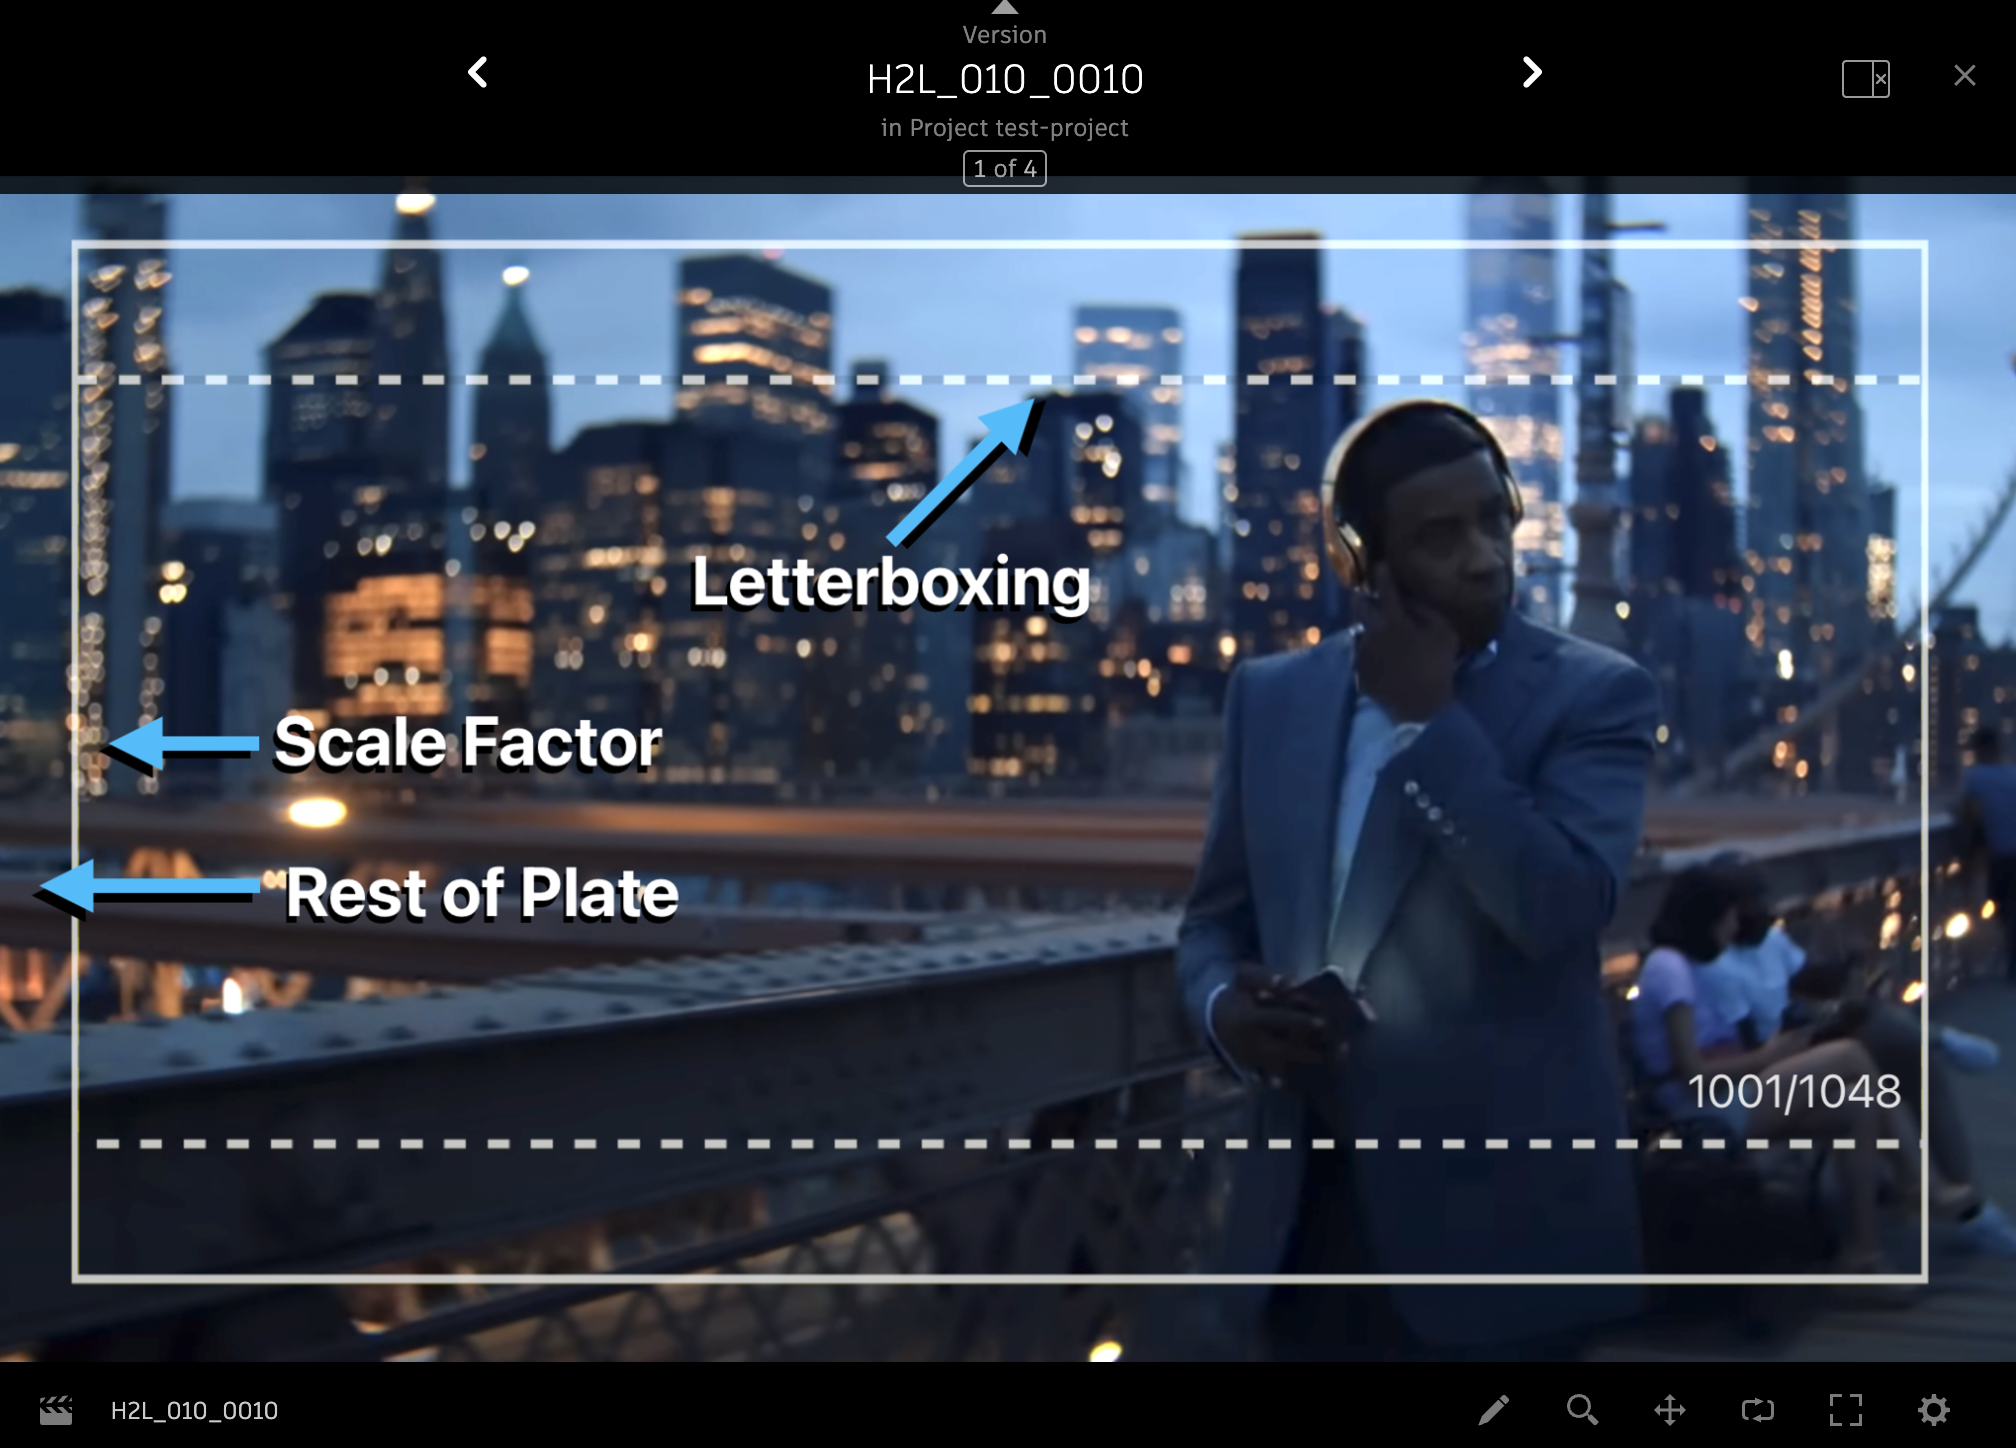
Denzel Washington crossing the Brooklyn Bridge. Shows overlay with letterboxing and scale factor over the rest of the plate.
Here's what the node graph looks like:

The Pipeline Information Node
At our facility, we had an ever growing PIPELINE_INFORMATION node. We used it with the SG toolkit and some python hooks with nuke's own API to replace the knob values with fields from ShotGrid.
Not pictured above, but had these knobs (and many more removed for this article):
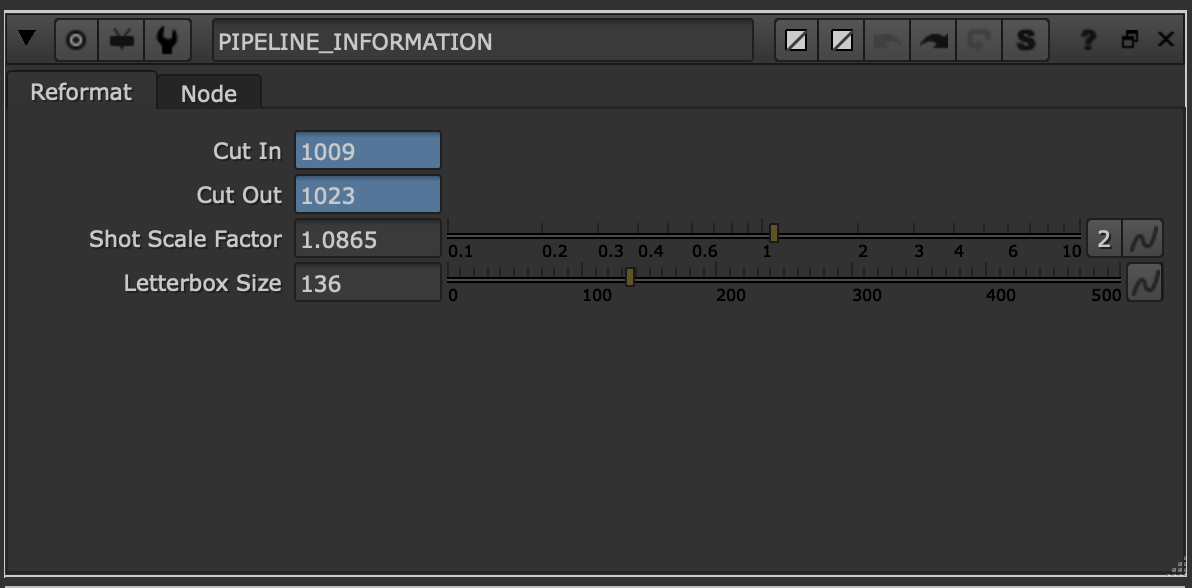
The expressions you're seeing in cut in and out are just default in case no value is set in SG (defaulting to 8x8 frame handles):
Cut in = read_in.first_frame+8 e.g 1001+9=1009
Cut out = read_in.last_frame-7 e.g 1030-7=1023
The important knob to take note of for now is Shot Scale Factor -- that knob connected to a field in shotgrid by the same name.

The Math for Previewing Scaling
wh_control
To start off, I needed a node that could act as an intermediary for a first bit of math I needed to do (aspect ratio calculations based on Shot Scale Factor). I needed the full width and height of the shot after the shot scale factor was be applied. I used an Nuke No-Op node with simple width and height parameters.
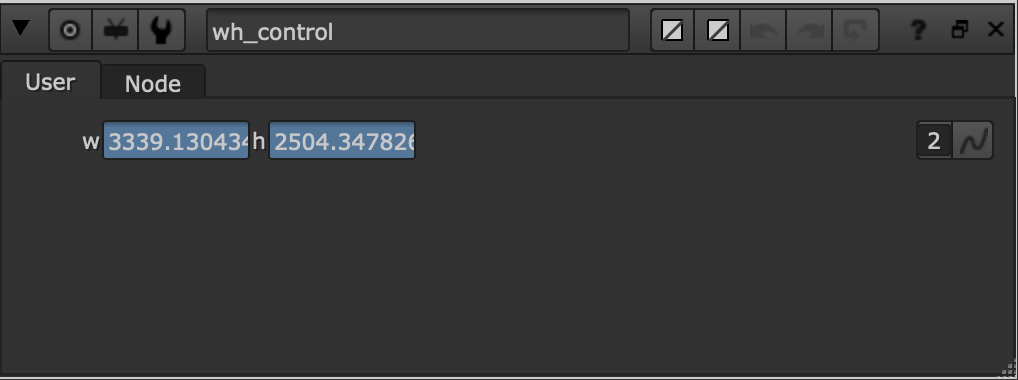
The expressions were as follows:
width = (read_in.width)*(1/PIPELINE_INFORMATION.scale)

height = ((PIPELINE_INFORMATION.reformat_ratio.height)/(PIPELINE_INFORMATION.reformat_ratio.width))*(wh_control.wh.w)*(read_in.pixel_aspect)
Calculating the width was relatively straight-forward. It's the width of the input plate, * 1 over the scale factor. So e.g 1.0856 scale factor for a 4K UHD plate (3840 pxls) means the width of value would be ≈ 3537 pixels.
The result is less than the input, even with a scale up, because the aim is to shrink down a rectangle overlay to accommodate what would be a scale up in the footage. It's counterintuitive but that's how it works!
The height required some work and some research. It needed to conform to the aspect ratio of the format being delivered for review, in this case 1920x1080, as well as accommodate for the pixel aspect ratio of the input plate.
This ensured consistent framing regardless of the input plate's original aspect ratio. It's not just e.g 1.0865 of a 3:2 plate. It had to be 1.0865, and then also adjusted for a 16:9 aspect ratio. Before we even talk about letterboxing (letterboxing was added in editorial and not consistent with plates original aspect ratio, and so needed to be treated as a separate parameter).
Creating No Fill Rectangles
I've found that the most precise way to create a rectangle with no fill, is to merge two rectangles, one inside the other with a merge node using the out operation. This allowed me to very specifically change the width and height of the "stroke" for each rectangle.
guide_outer
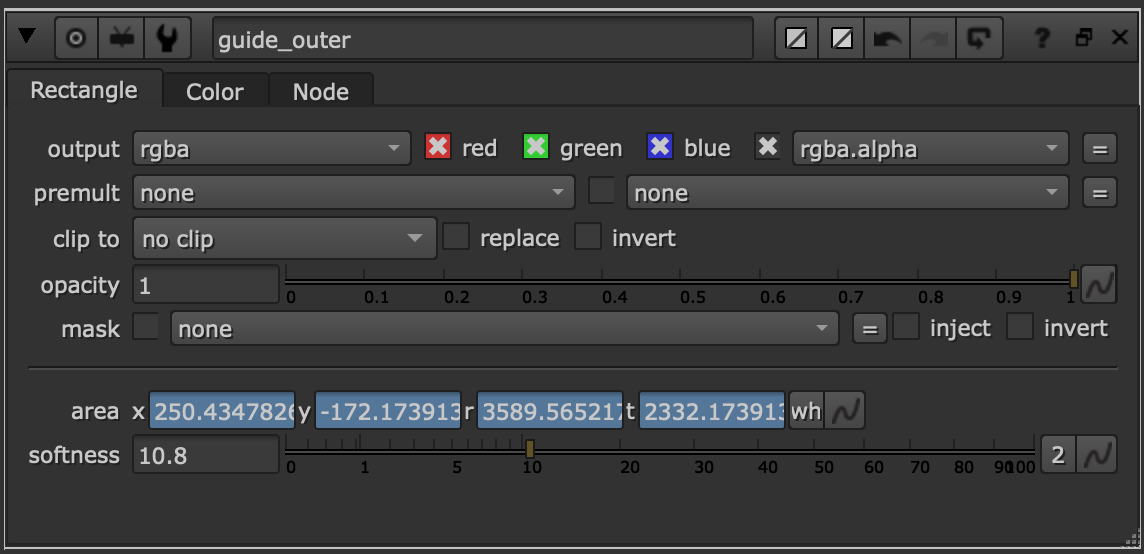
area x = ([metadata input/width]-(wh_control.wh.w))/2
area y = ([metadata input/height]-(wh_control.wh.h))/2
For both the left edge and bottom edge of the rectangle that I wanted to make, I needed to find the distance from the original edge of the plate and the new edge of each guide overlay. I did this with the wh control node (which represented the rectangle's dimensions after scale factor). I took the difference between original and overlay rectangles and divided that by two to essentially center the rectangle. (this took me a while to figure out).
Here's what I mean:
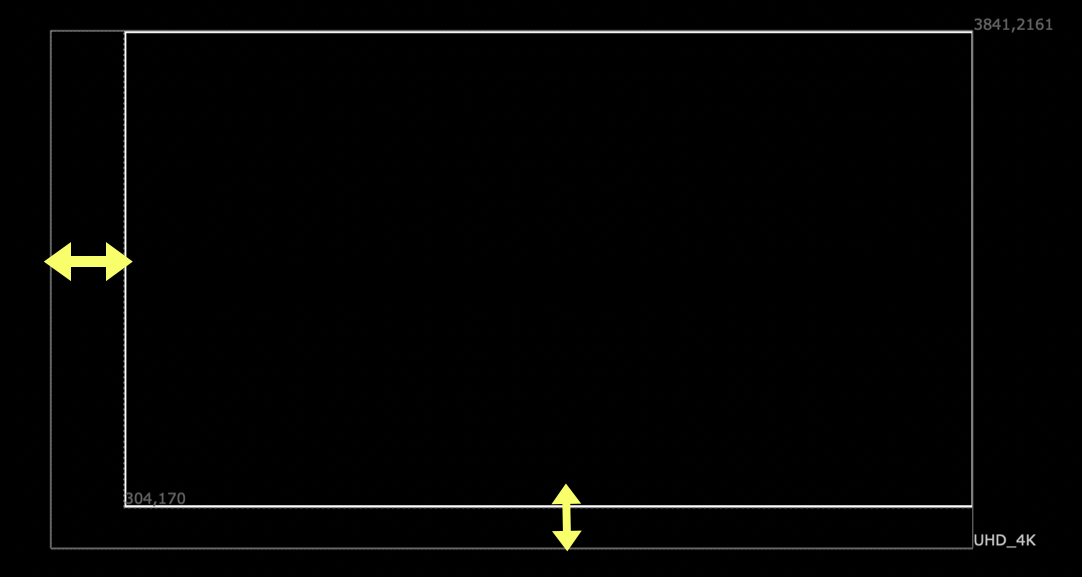
rectangle is up in top right corner because both left edge and bottom edge start too far right and too far up respectively.
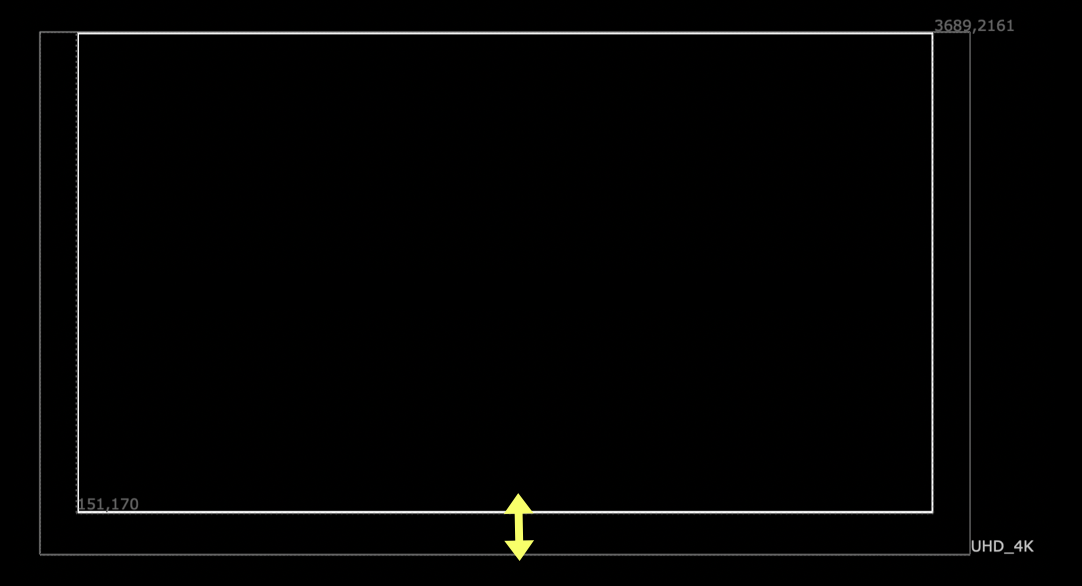
dividing the x value by two, the left edge comes over and centers the rectangle horizontally.
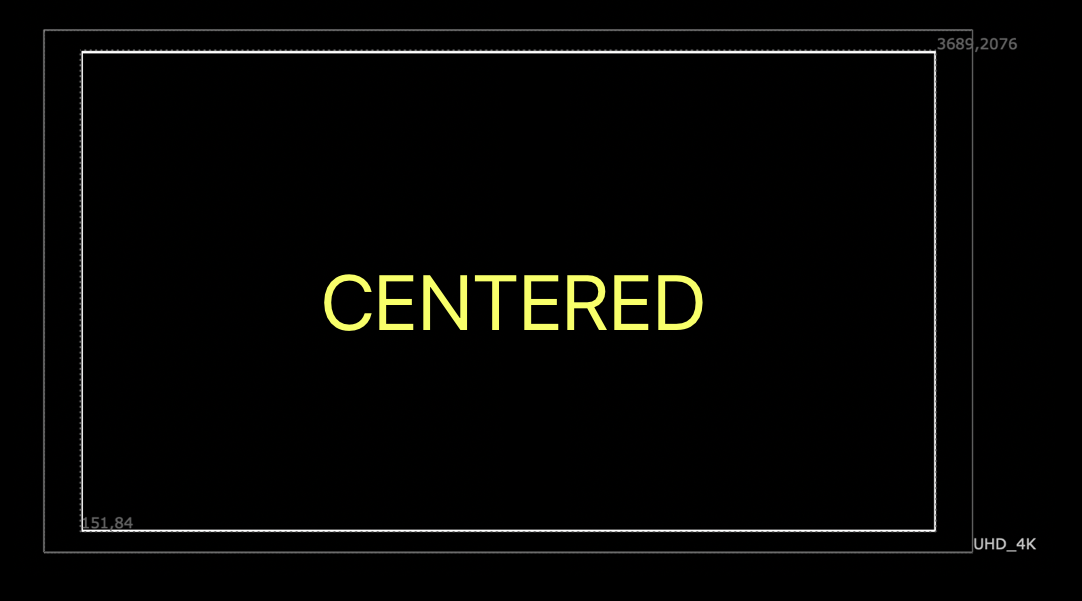
dividing the y value by two, the bottom edge comes down and centers the rectangle vertically.
Moving on:
area r = (area.x)+(wh_control.wh.w)
area t = (area.y)+(wh_control.wh.h)
Both the right and top edges of the rectangle were simpler, they just needed to reflect the rest of the rectangle from wh_control node. From the starting points of area.x and area.y, add wh_contol.wh.w OR h.
guide_inner
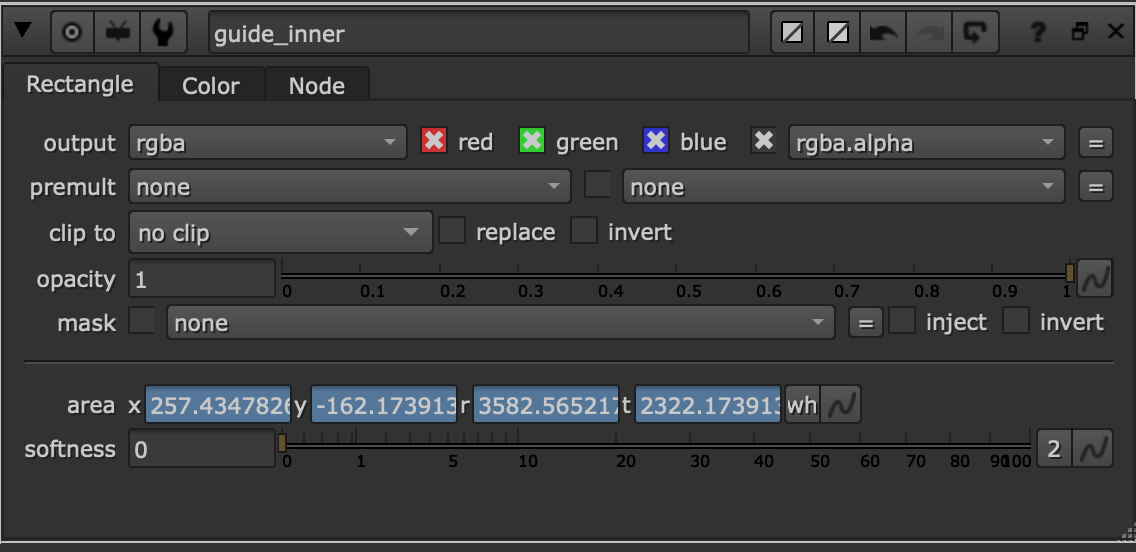
The guide_inner node is straight-forward, it just allowed me to set the stroke width of the rectangle. Expressions are below:
area x = guide_outer.area.x + 7
area y = guide_outer.area.y + 10
area r = guide_outer.area.r - 7
area t = guide_outer.area.t - 10
The Math For Letterboxing
Letterboxing was interesting, because I knew I only needed two lines. They needed to be the width of the top and bottom of my rectangle, but could respond to a knob on PIPELINE_INFORMATION for where they should sit on the y-axis. The other thing I knew is that the position of the letterboxing guide neeeded to be relative to the size of the guide rectangle. So essentially, their position on the y-axis needed to be a percentage of the top and bottom edges of the guide rectangle rather than anything fixed.
letterbox_outer
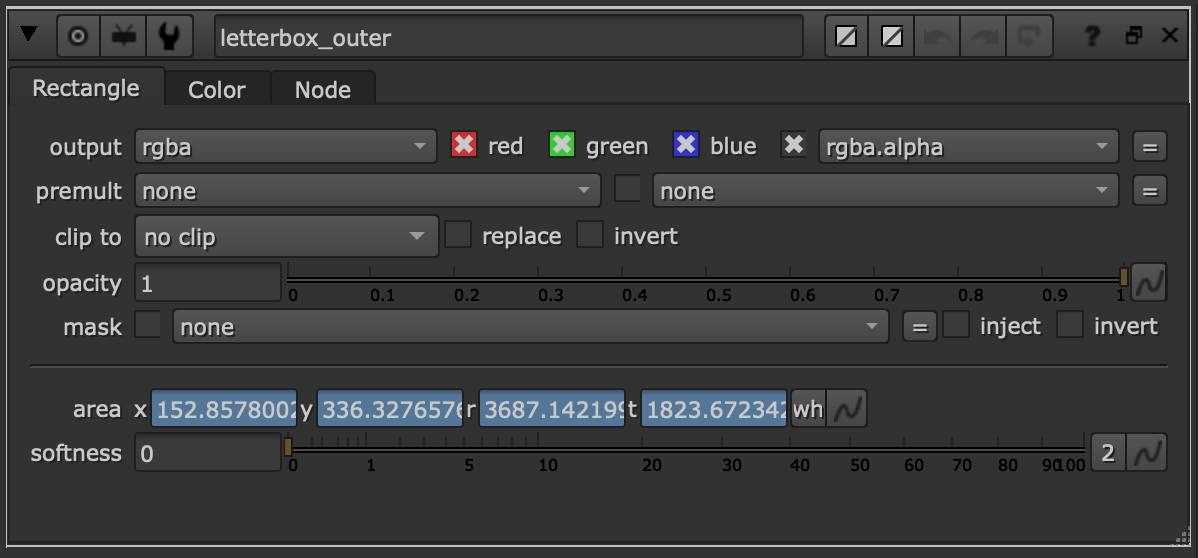
area x = ([metadata input/width]-(wh_control.wh.w))/2
Using the same method as the previous box, I created the vertal edges of my letterboxing box (I kept these just in case I needed pillar boxing in the future).
area y = (guide_outer.area.y)+(guide_outer.area.t-guide_outer.area.y)*(PIPELINE_INFORMATION.letterbox/PIPELINE_INFORMATION.reformat_ratio.height)
The formula for the bottom edge, is the bottom edge of the guide rectangle, plus the stroke width of the outer rectangle (this was to keep letterboxing visible unless turned off), times letterboxing knob's value -- divided by the reformat aspect ratio.
area r = (area.x)+(wh_control.wh.w)
area t = (guide_outer.area.t)-(guide_outer.area.t-guide_outer.area.y)*(PIPELINE_INFORMATION.letterbox/PIPELINE_INFORMATION.reformat_ratio.height)
area t is the same as area y but corresponds to outer.area.t instead of outer.area.y.
letterbox_inner
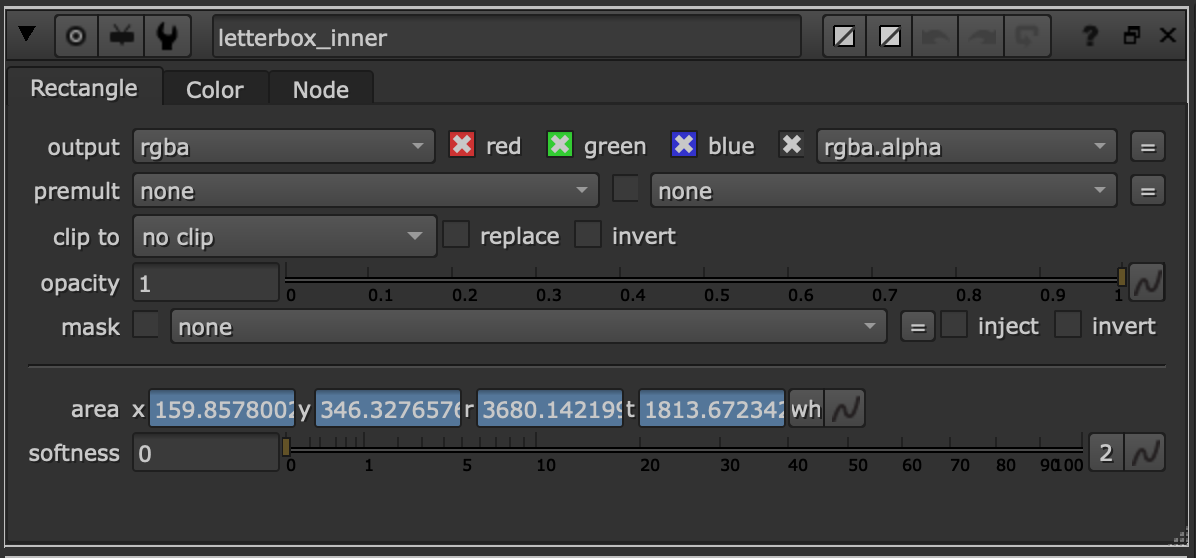
Similar to the guide rectangles, the letterbox_inner node really only existed to manage stroke width. Expressions below:
area x = letterbox_guide.area.x + 7
area y = letterbox_guide.area.y + 10
area r = letterbox_guide.area.r - 7
area t = letterbox_guide.area.t - 10
Changing Colors For Handles
In addition to the Shot Scale Factor and Letterboxing needed for framing, the team on Spike's project also requested that we put together a way to show what was in the handles vs what was in the cut. I used the Cut In and Cut Out fields in SG along with some Tcl expressions to change the color of the whole overlay for our supervisors internally, this was then also applied to the frame counters and burnins on our final review exports.
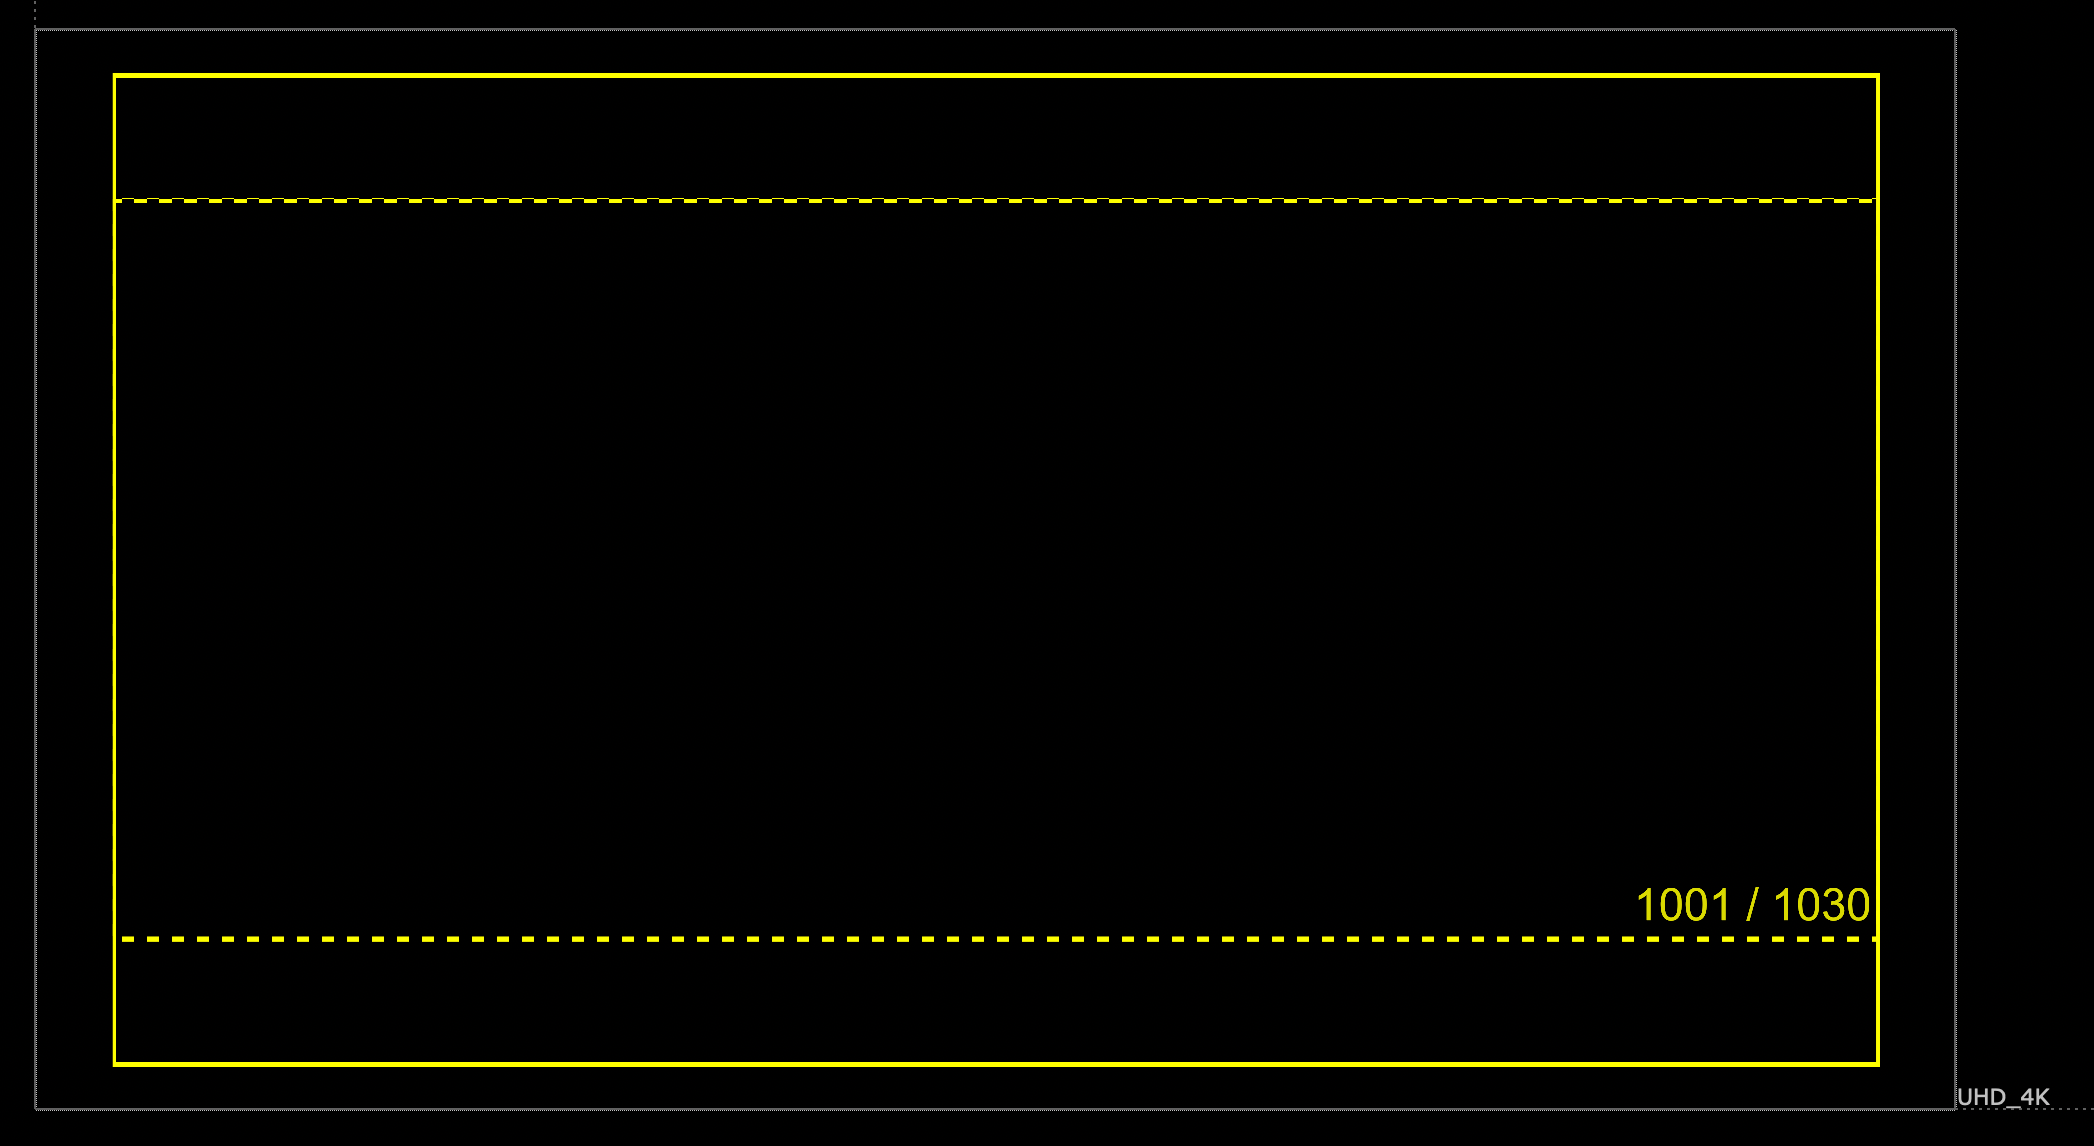
Framing box and frame counter stay yellow until cut-in.
handles_color
The expressions were used on an expression node with some user-managed knobs for the RGB channels.
Expressions were:
red = (frame <= (PIPELINE_INFORMATION.cut_in -1) || frame >= (PIPELINE_INFORMATION.cut_out +1)) ? 1 : 1

green = (frame <= (PIPELINE_INFORMATION.cut_in -1) || frame >= (PIPELINE_INFORMATION.cut_out +1)) ? 1 : 1

blue = (frame <= (PIPELINE_INFORMATION.cut_in -1) || frame >= (PIPELINE_INFORMATION.cut_out +1)) ? 0 : 1
Availability For Use
This guides setup is here on github and is free to use by whomever. It is however part of a much larger workflow I'm not comfortable sharing, and you'll need to have some pipeline integrations that let you pull the values for Cut In and Cut Out as well as Shot Scale Factor to use it effectively.